
It is necessary to know a way to deploy your rails application to your server, it can be production or staging, etc. Capistrano is a good choice that you might want to consider. In this note I will show you how I used Capistrano, Puma & Nginx to deploy my Rails application to Amazon EC2 to deploy your app for production and staging environments.
You can find out more detail about Capistrano, Puma and Nginx
In this blog, there will be only a short guide to help you quickly deploy your application to Amazon Server
Prerequisite
- First, you need to have a Rails application with root route
- Your local machine has GIT installed.
- You generated SSH key on your local, added it to your Github account
- Your project is already pushed to Github
- You have an Amazon Web Service account. You can try a micro plan to have 1 year free after adding your payment method ( just to verify )
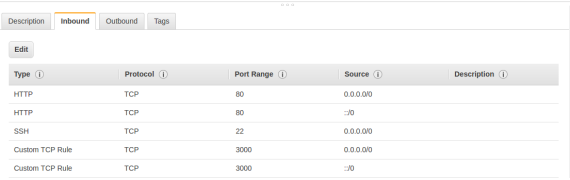
- You have an Amazon EC2 instance (micro). Your instance Security is configured to open SSH connection (port 22 as default) and HTTP connection (port 80 as default). Because we are deploying our application to multiple ports, you need to set another custom 3000 port, like below image:
And you have a .pem file to connect to your instance. You can usessh -i test-rails-cap.pem ubuntu@YOUR_EC2_IPV4on local to access to remote
Setting up your EC2 Instance
-
-
Install Ruby
gpg --keyserver hkp://keys.gnupg.net --recv-keys 409B6B1796C275462A1703113804BB82D39DC0E3
curl -sSL https://get.rvm.io | bash -s stable
rvm requirements
rvm install 2.5.1
# You should install the same Ruby version your project is using
rvm use 2.5.1 --default
source ~/.rvm/scripts/rvm
-
Install Rails
gem install rails -v 3.0.1 --no-ri --no-rdoc
gem install bundler --no-ri --no-rdoc
rails -v
-
Install MySql
sudo apt-get install mysql-server
You can test your Mysql by trying to access MySql via terminal
mysql -u root -p -
Install nginx
sudo apt-get update
sudo apt-get install curl git-core nginx -y
On your EC2 instance, please change default user in
sudo nano /etc/nginx/nginx.confto ubuntu. Please take care of the log nginx files. I think you will need someday.Overall, It should look like below
# user www-data; user ubuntu; worker_processes auto; pid /run/nginx.pid; events { worker_connections 768; # multi_accept on; } http { ## # Basic Settings ## sendfile on; tcp_nopush on; tcp_nodelay on; keepalive_timeout 65; types_hash_max_size 2048; # server_tokens off; # server_names_hash_bucket_size 64; # server_name_in_redirect off; include /etc/nginx/mime.types; default_type application/octet-stream; ## # SSL Settings ## ssl_protocols TLSv1 TLSv1.1 TLSv1.2; # Dropping SSLv3, ref: POODLE ssl_prefer_server_ciphers on; ## # Logging Settings ## access_log /var/log/nginx/access.log; error_log /var/log/nginx/error.log; ## # Gzip Settings ## gzip on; gzip_disable "msie6"; # gzip_vary on; # gzip_proxied any; # gzip_comp_level 6; # gzip_buffers 16 8k; # gzip_http_version 1.1; # gzip_types text/plain text/css application/json application/javascript text/xml application/xml application/xml+rss text/javascript; ## # Virtual Host Configs ## include /etc/nginx/conf.d/*.conf; include /etc/nginx/sites-enabled/*; } #mail { # # See sample authentication script at: # # http://wiki.nginx.org/ImapAuthenticateWithApachePhpScript # # # auth_http localhost/auth.php; # # pop3_capabilities "TOP" "USER"; # # imap_capabilities "IMAP4rev1" "UIDPLUS"; # # server { # listen localhost:110; # protocol pop3; # proxy on; # } # # server { # listen localhost:143; # protocol imap; # proxy on; # } #} -
Add SSH
In order to be able to pull code from github, via ssh, you need to generate ssh for your remote server and add the public key to github ssh settings
-
- Generate ssh key
ssh-keygen -t rsa -b 4096 -C "YOUR EMAIL"And then Enter and Enter and Enter - Start SSH agent
eval "$(ssh-agent -s)" - Add ssh key to agent
ssh-add ~/.ssh/id_rsa - Get SSH key
cat ~/.ssh/id_rsa.pub - Copy all the key and add new SSH key on your Github SSH Settings web page
- Generate ssh key
After all of above process, you can test your server & github connection by cloning a project (then, you can delete it, cause we will do it automatically later)
git clone git@github.com:your_github_account/your_app_name.git
Then, you can delete it on your remote
rm -rf your_app_name -
-
Authorizing your local to remote
Next, in order to access to your remote server from local, you need to add your local public ssh key (If you don’t have, generate one as above step) to your remote authorized keys. Run below command locally
cat ~/.ssh/id_rsa.pub | ssh -i your_pem_file remote_server_user@your_server_ip 'cat >> ~/.ssh/authorized_keys'
Then, you can test by running simpler command to access to remote server
ssh remote_server_user@your_server_ip -
Add dependent Gems
Of course, you will need add Capistrano, Puma, and some js dependencies if you haven’t added yet.
Add below code to your Gemfilegroup :development do gem 'capistrano', '~> 3.11.0', require: false gem 'capistrano-rvm', '~> 0.1.2', require: false gem 'capistrano-rails', '~> 1.4.0', require: false gem 'capistrano-bundler', '~> 1.3.0', require: false gem 'capistrano3-puma', '~> 3.1.1', require: false end gem 'puma', '~> 3.11.4' # You might want to check if this gem is already added or not gem 'execjs' gem 'therubyracer'
And as normal, run
bundleto update your libraries -
Install Capistrano
First thing you need to do with Capistrano is to set up it. Run
cap install. This command will generate 3 files for you- Capfile in the root directory of your Rails app
- deploy.rb file in the config directory
- deploy directory in the config directory
Then, you need to change the content of them. The first file is
Capfile# Load DSL and Setup Up Stages require 'capistrano/setup' require 'capistrano/deploy' require 'capistrano/rails' require 'capistrano/bundler' require 'capistrano/rvm' require 'capistrano/puma' install_plugin Capistrano::Puma # Default puma tasks # install_plugin Capistrano::Puma::Workers # if you want to control the workers (in cluster mode) # install_plugin Capistrano::Puma::Jungle # if you need the jungle tasks # install_plugin Capistrano::Puma::Monit # if you need the monit tasks # install_plugin Capistrano::Puma::Nginx # if you want to upload a nginx site template require "capistrano/scm/git" install_plugin Capistrano::SCM::Git # Loads custom tasks from `lib/capistrano/tasks' if you have any defined. Dir.glob('lib/capistrano/tasks/*.rake').each { |r| import r }Next, remove all the content of
config/deploy.rband then change content ofconfig/deploy/production.rbto# Change these # By default your port will be 22 server 'YOUR_SERVER_IP', port: YOUR_PORT, roles: [:web, :app, :db], primary: true set :repo_url, 'YOUR_GIT_URL' set :application, 'YOUR_APP_NAME_production' set :user, 'ubuntu' set :puma_threads, [4, 16] set :puma_workers, 0 # Don't change these unless you know what you're doing set :pty, true set :use_sudo, false set :stage, :production set :deploy_via, :remote_cache set :deploy_to, "/home/#{fetch(:user)}/apps/#{fetch(:application)}" set :puma_bind, "unix://#{shared_path}/tmp/sockets/#{fetch(:application)}-puma.sock" set :puma_state, "#{shared_path}/tmp/pids/puma.state" set :puma_pid, "#{shared_path}/tmp/pids/puma.pid" set :puma_access_log, "#{release_path}/log/puma.access.log" set :puma_error_log, "#{release_path}/log/puma.error.log" set :ssh_options, { forward_agent: true, user: fetch(:user), keys: %w(~/.ssh/id_rsa.pub) } set :puma_preload_app, true set :puma_worker_timeout, nil set :puma_init_active_record, true # Change to false when not using ActiveRecord ## Defaults: # set :scm, :git # set :branch, :master # set :format, :pretty # set :log_level, :debug # set :keep_releases, 5 ## Linked Files & Directories (Default None): # set :linked_files, %w{config/database.yml} # set :linked_dirs, %w{bin log tmp/pids tmp/cache tmp/sockets vendor/bundle public/system} namespace :puma do desc 'Create Directories for Puma Pids and Socket' task :make_dirs do on roles(:app) do execute "mkdir #{shared_path}/tmp/sockets -p" execute "mkdir #{shared_path}/tmp/pids -p" end end before :start, :make_dirs end namespace :deploy do desc "Make sure local git is in sync with remote." task :check_revision do on roles(:app) do unless `git rev-parse HEAD` == `git rev-parse origin/master` puts "WARNING: HEAD is not the same as origin/master" puts "Run `git push` to sync changes." exit end end end desc 'Initial Deploy' task :initial do on roles(:app) do invoke 'deploy' end end before :starting, :check_revision after :finishing, :compile_assets after :finishing, :cleanup after :finishing, :restart end # ps aux | grep puma # Get puma pid # kill -s SIGUSR2 pid # Restart puma # kill -s SIGTERM pid # Stop pumaYou need to change your
config/deploy/staging.rbalso# By default your port will be 22 server 'YOUR_SERVER_IP', port: YOUR_PORT, roles: [:web, :app, :db], primary: true set :repo_url, 'YOUR_GIT_URL' set :application, 'YOUR_APP_NAME_staging' set :user, 'ubuntu' set :puma_threads, [4, 16] set :puma_workers, 0 set :branch, :staging set :port, 3000 # Don't change these unless you know what you're doing set :pty, true set :use_sudo, false set :stage, :production set :deploy_via, :remote_cache set :deploy_to, "/home/#{fetch(:user)}/apps/#{fetch(:application)}" set :puma_bind, "unix://#{shared_path}/tmp/sockets/#{fetch(:application)}-puma.sock" set :puma_state, "#{shared_path}/tmp/pids/puma.state" set :puma_pid, "#{shared_path}/tmp/pids/puma.pid" set :puma_access_log, "#{release_path}/log/puma.access.log" set :puma_error_log, "#{release_path}/log/puma.error.log" set :ssh_options, { forward_agent: true, user: fetch(:user), keys: %w(~/.ssh/id_rsa.pub) } set :puma_preload_app, true set :puma_worker_timeout, nil set :puma_init_active_record, true # Change to false when not using ActiveRecord ## Defaults: # set :scm, :git # set :format, :pretty # set :log_level, :debug # set :keep_releases, 5 ## Linked Files & Directories (Default None): # set :linked_files, %w{config/database.yml} # set :linked_dirs, %w{bin log tmp/pids tmp/cache tmp/sockets vendor/bundle public/system} namespace :puma do desc 'Create Directories for Puma Pids and Socket' task :make_dirs do on roles(:app) do execute "mkdir #{shared_path}/tmp/sockets -p" execute "mkdir #{shared_path}/tmp/pids -p" end end before :start, :make_dirs end namespace :deploy do desc "Make sure local git is in sync with remote." task :check_revision do on roles(:app) do unless `git rev-parse HEAD` == `git rev-parse origin/master` puts "WARNING: HEAD is not the same as origin/master" puts "Run `git push` to sync changes." exit end end end desc 'Initial Deploy' task :initial do on roles(:app) do invoke 'deploy' end end before :starting, :check_revision after :finishing, :compile_assets after :finishing, :cleanup after :finishing, :restart end # ps aux | grep puma # Get puma pid # kill -s SIGUSR2 pid # Restart puma # kill -s SIGTERM pid # Stop pumaThen, you need to create a new folder and file called
config/nginx/nginx_production.confThis file will be symlink to be nginx configuration on your remote server. Every time you need to change that nginx configuration, you can update this file, and symlink again on your remote server. Please change theYOUR_APP_NAME_productionbelow to your application name# config/nginx/nginx_production.conf upstream puma { server unix:///home/deploy/apps/YOUR_APP_NAME_production/shared/tmp/sockets/YOUR_APP_NAME_production-puma.sock; } server { listen 80 default_server deferred; # server_name example.com; root /home/deploy/apps/YOUR_APP_NAME_production/current/public; access_log /home/deploy/apps/YOUR_APP_NAME_production/current/log/nginx.access.log; error_log /home/deploy/apps/YOUR_APP_NAME_production/current/log/nginx.error.log info; location ^~ /assets/ { gzip_static on; expires max; add_header Cache-Control public; } try_files $uri/index.html $uri @puma; location @puma { proxy_set_header X-Forwarded-For $proxy_add_x_forwarded_for; proxy_set_header Host $http_host; proxy_redirect off; proxy_pass http://puma; } error_page 500 502 503 504 /500.html; client_max_body_size 10M; keepalive_timeout 10; }You will need another nginx configuration for another environment and port. I call it
config/nginx/nginx_staging.conf# config/nginx/nginx_staging.conf upstream staging { server unix:///home/ubuntu/apps/YOUR_RAILS_APP_staging/shared/tmp/sockets/cap-rails-staging-puma.sock; } server { listen 3000 default_server deferred; # server_name example.com; root /home/ubuntu/apps/YOUR_RAILS_APP_staging/current/public; access_log /home/ubuntu/apps/YOUR_RAILS_APP_staging/current/log/nginx.access.log; error_log /home/ubuntu/apps/YOUR_RAILS_APP_staging/current/log/nginx.error.log info; location ^~ /assets/ { gzip_static on; expires max; add_header Cache-Control public; } try_files $uri/index.html $uri @staging; location @staging { proxy_set_header X-Forwarded-For $proxy_add_x_forwarded_for; proxy_set_header Host $http_host; proxy_redirect off; proxy_pass http://staging; } error_page 500 502 503 504 /500.html; client_max_body_size 10M; keepalive_timeout 10; }However, before you can symlink the above nginx configuration file, you need to make the first deployment
-
Make first deployment
First, you can run the initial deployment command
cap production deploy:initial
cap staging deploy:initial
You need to add secret key base to remote server. Because Rails 5.2 uses
credentials, notsecrets, andcredentialsdepends onmaster.key, copy the file to your remote serverscp /config/master.key YOUR_REMOTE_USER@YOUR_REMOTE_IP:/home/YOUR_REMOTE_USER/apps/YOUR_APP_NAME_production/shared/config/ scp /config/master.key YOUR_REMOTE_USER@YOUR_REMOTE_IP:/home/YOUR_REMOTE_USER/apps/YOUR_APP_NAME_staging/shared/config/
-
Update Nginx
In order to access to your remote IP, and get your application works, you need to config Nginx correctly, and listen to the same socket that puma uses.
First, symlink theconfig/nginx/nginx_production.confandconfig/nginx/nginx_staging.confin your current deploy app, which’s just pushed to server, to the/etc/nginx/sites-enableddirectory# the default remote config, you can backup it first sudo rm /etc/nginx/sites-enabled/default # symlink new configuration file sudo ln -nfs "/home/deploy/apps/YOUR_APP_NAME_production/current/config/nginx/nginx_production.conf" "/etc/nginx/sites-enabled/YOUR_APP_NAME_production" sudo ln -nfs "/home/deploy/apps/YOUR_APP_NAME_production/current/config/nginx/nginx_staging.conf" "/etc/nginx/sites-enabled/YOUR_APP_NAME_staging"
You must restart Nginx after new configuration
sudo service nginx restart
Now, all things are set, you can get your reward by accessing to your remote IP address on your web browser, for port 80 and port 3000
-
Next time, after pushing new code to your github, you can deploy updates to your remote server by just typing
cap production deploy
cap staging deploy
There are some other commands you should know
cap production / staging puma:status
cap production / staging puma:start
cap production / staging puma:stop
cap production / staging puma:restart
Hope it helpful! Enjoy
