Why Shopify and Shopify App
If you’re excited about Ruby on Rails and e-commerce market like me, you might know about Shopify and Spree. However, you might notice that comparing to Spree, Shopify recently has been growing very fast, and there’s always a big demand on this market.
That’s the reason why currently I am working as a Shopify developer for a Singaporean startup in coffee industry. I realize that a lot, a lot of start up companies use Shopify as their platform to build online web stores, at least in this industry area. For almost a half of year, we’ve stayed together to build a cool Shopify market together and continuously added new features to the web app, upgraded the website UI & UX. And, almost the cases, we found a good Shopify App from the Shopify App Store.
Later, after launching the project, we start thinking about create our own Shopify application that will work best for our store, and that provides us freedom to customize, and we decided to go. In this article I will share some of my experience in creating a public Shopify custom app.
Before we go in detail, you can find the GITHUB SOURCE
Type of Applications in Shopify
There are 2 types of applications Shopify provide us
- Private Applications: Private apps are built exclusively for your Shopify store. You can use private apps to add features to your Shopify admin, access your store’s data directly using Shopify’s APIs, or extend your online store to other platforms using custom storefronts.
- Public Applications: A public Shopify app can interact with the Shopify API on behalf of multiple stores. To authenticate with Shopify using a public app, you’ll need to generate the credentials from your Partner Dashboard and then use them to implement OAuth.
In this post, I will talk about public Shopify Application.
Register as Shopify Partner
In order to create a custom Shopify public application, you must register as Shopify partner
First, go to Shopify partner page to register yourself. After registering, create your own Shopify public app

Then, go to your application => click on App setup and scroll down you will see there’s API Key and API Secret Key Keep in mind we have those keys, and we will use later.
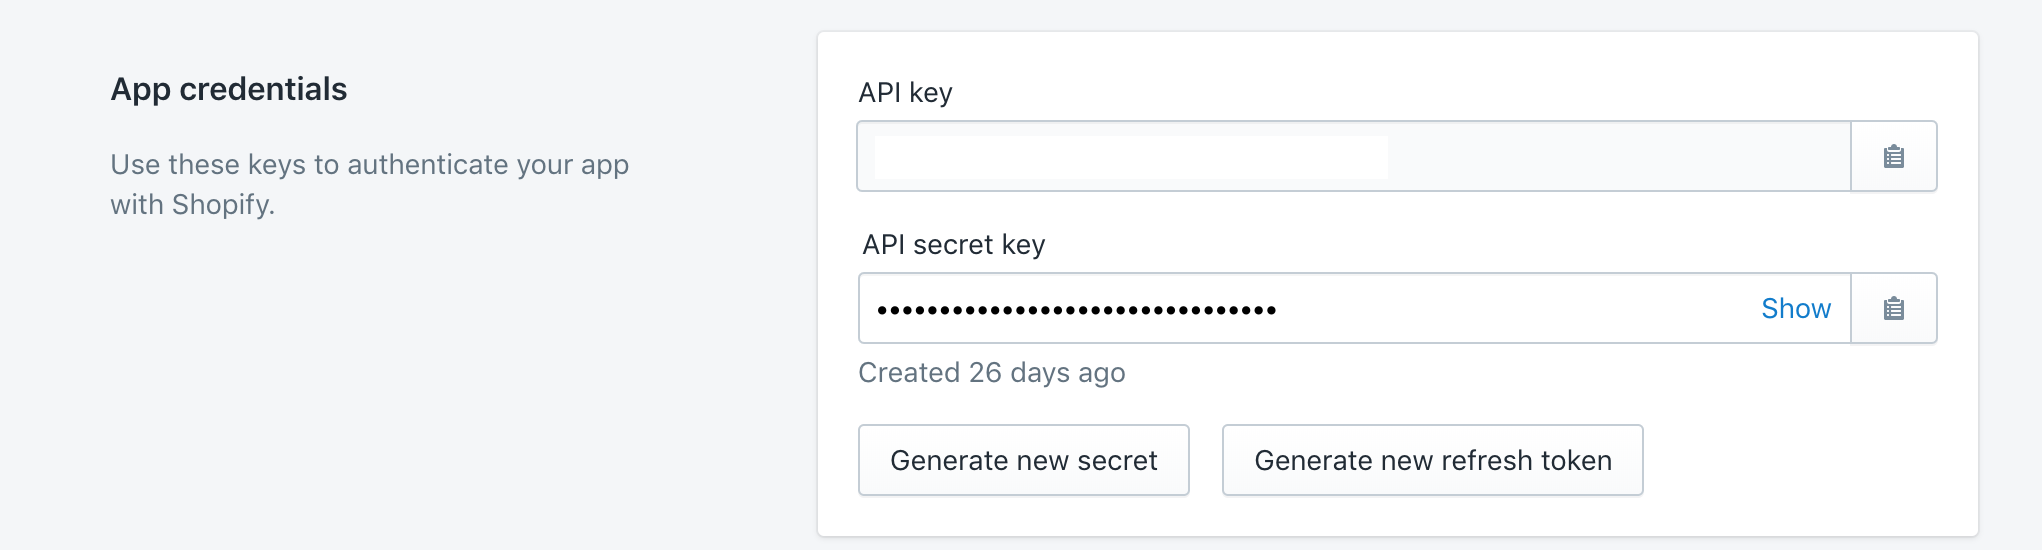
Also, later you need to comeback to this screen to fill in our server url where Shopify can access & load the content to embed in it
Create Ruby on Rails Application
In this part I assume that you have Ruby on Rails install and run on your PCs.
As usual, what you need is to initialize the Rails app by command rails new your_app_name ( let’s call it master-metafields as example )
Go to your app folder, run rails s to start the server. At this point, you will see a welcome page only. In order to make it available for remote access from Shopify, you need to host it on a cloud. This simple post I will introduce two ways: heroku and ngrok. If you want to push your app to Heroku , a very popular hosting platform, please take a look at this official detail document.
Setup ngrok
ngrok is a powerful tool for publishing your local application to the Internet. It’s easy to use. You need to download it and follow the instruction to run it on your local. After downloading and setting up ngrok, start it on port 3000 cause our local rails server is running on this port
./ngrok http 3000
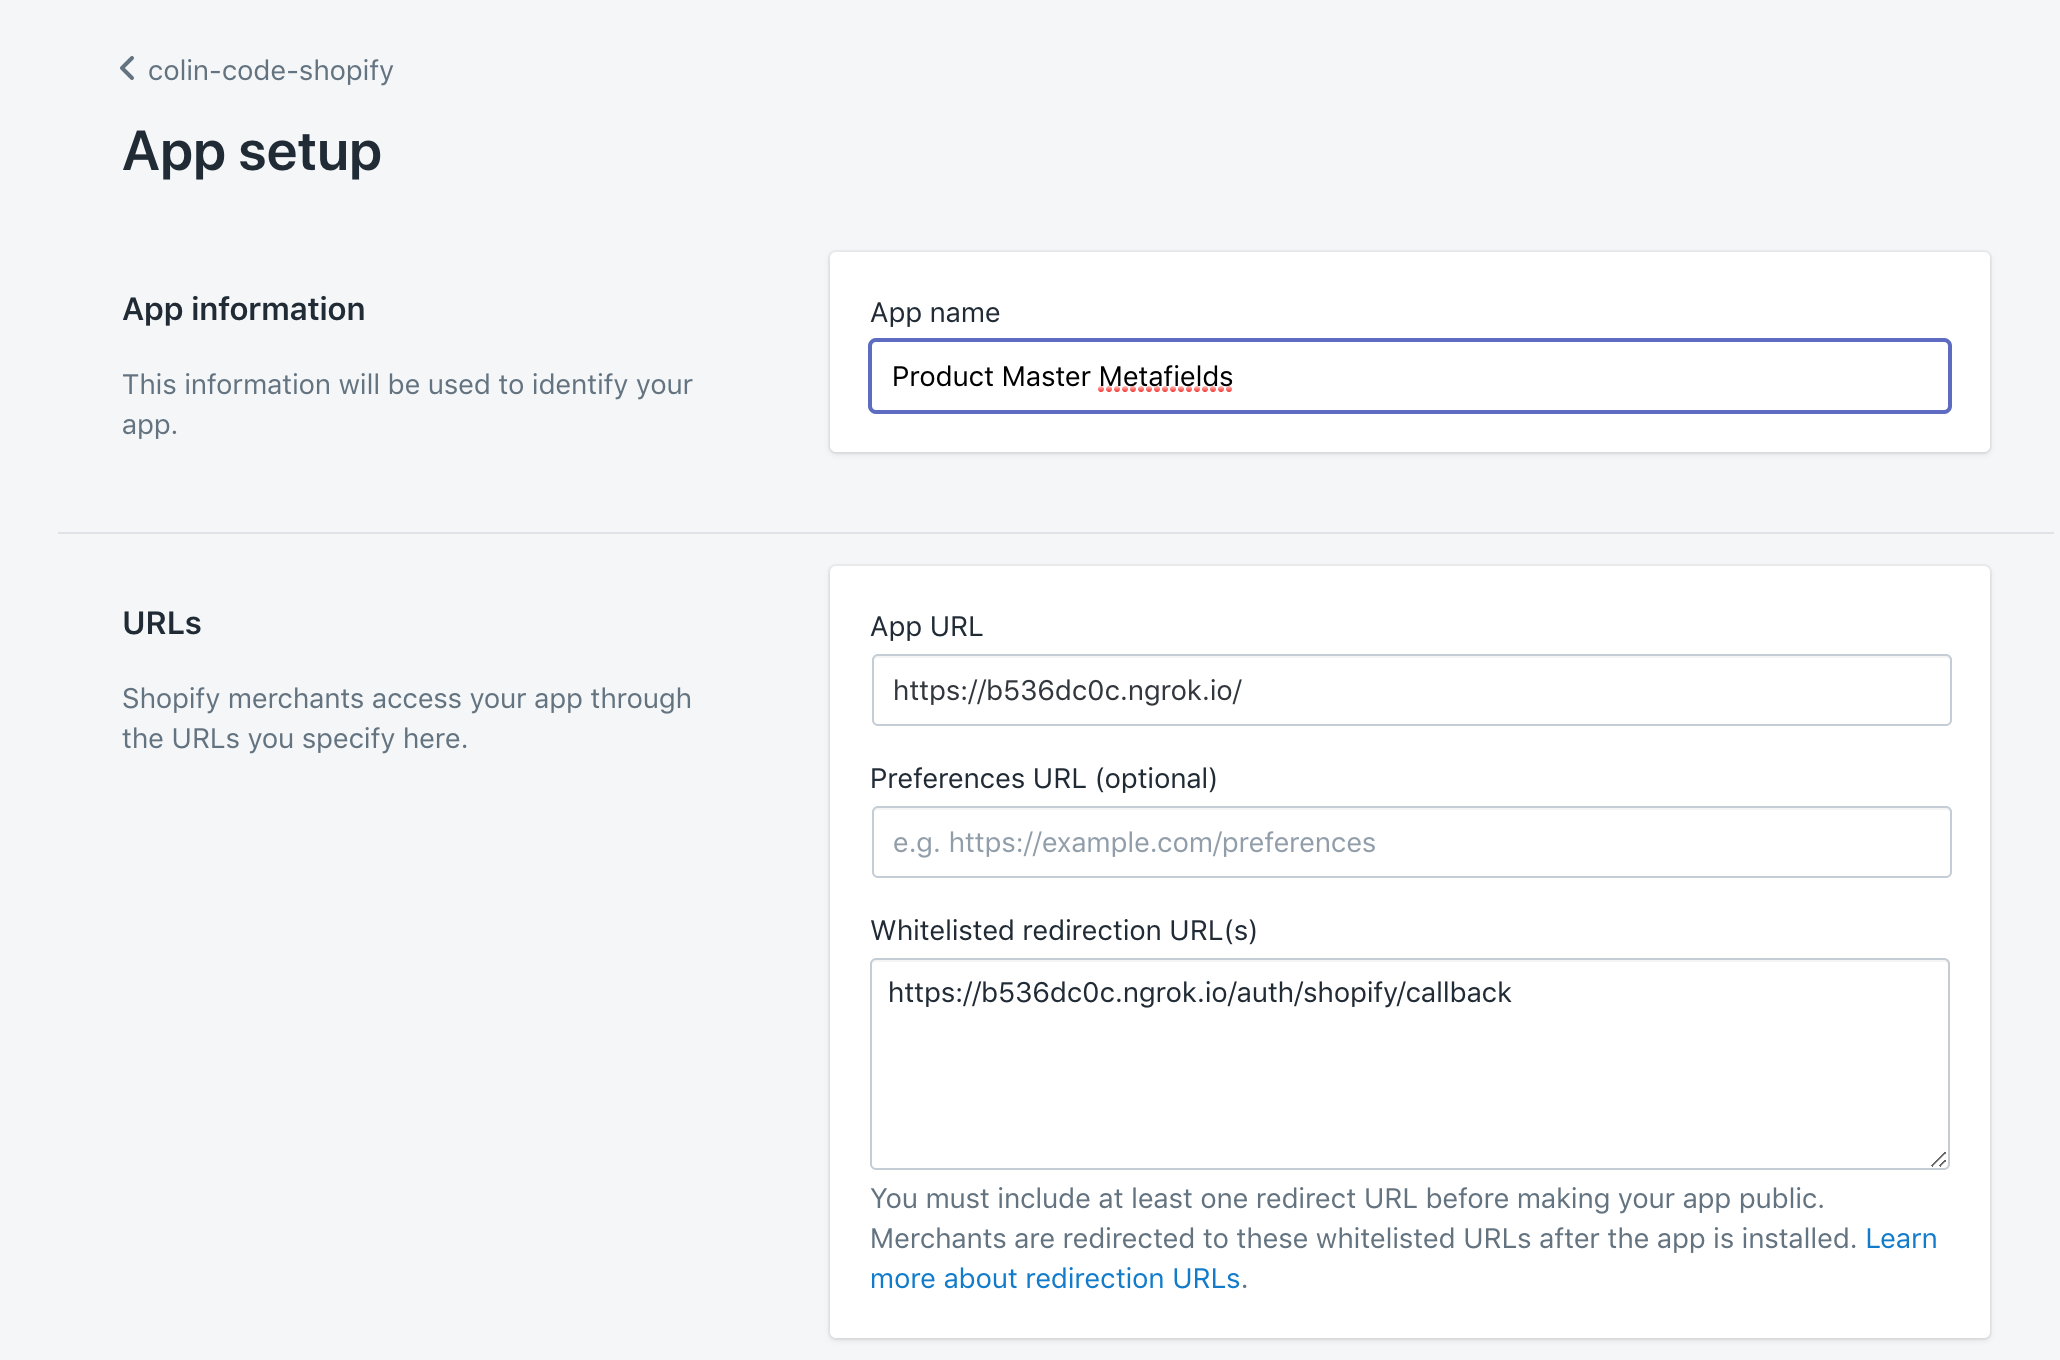
Now your application is up for shopify app to connect. You will have a random URL for your local server, then, copy it and use it for your Shopify custom app as in the above image.
Please note that every time you stop ngrok, your shopify app will not be able to run. When you start ngrok again, you will have another URL and you need to change it in your Shopify app setup. Later, you can use your Heroku link of your app, or a public domain that you deploy on any cloud hosting service, for the URL configuration in Shopify app.
Setup shopify_app
Now, the first thing you need to do with your master-metafields project is to add gem shopify_app to your Gemfile and bundle install the new gem
You can read more about the gem here
Use above shopify app api_key and secret to install shopify app
$ rails generate shopify_app --api_key <your_api_key> --secret <your_app_secret>
Above command will install the gem, generate Shop Model and Home Controller and authenticate your application to Shopify stores.
Setup Env Variables
From Rails 5.2 we have another new way to store our env variables using its credentials
You can edit those variables using
$ EDITOR="nano" rails credentials:edit
Then, edit config/initializers/shopify_app.rb
ShopifyApp.configure do |config|
  config.application_name = "Your Shopify App Name"
  config.api_key = Rails.application.credentials.shopify_api_key
  config.secret = Rails.application.credentials.shopify_api_secret

  config.scope = "read_orders, write_products"
  # Consult this page for more scope options:
  # https://help.shopify.com/en/api/getting-started/authentication/oauth/scopes

  config.embedded_app = true
  config.after_authenticate_job = false
  config.api_version = "2019-04"
  config.session_repository = Shop
end

  # config.redirect_uri = "http://localhost:3000/auth/shopify/callback"

end
Install your Shopify App to your Shopify Store
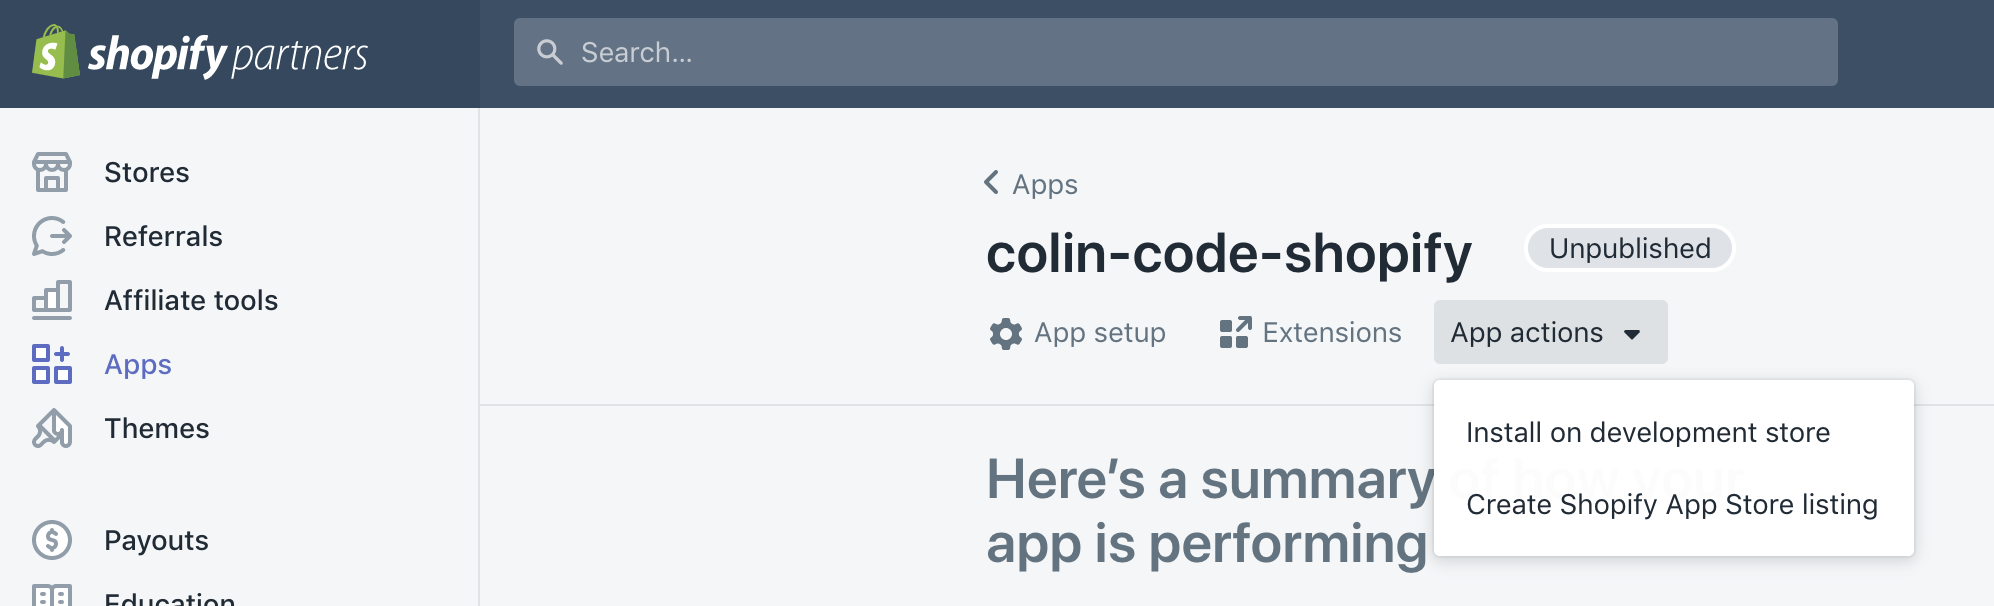
From your Shopify Partner account, you can see an option to create a store. From here, create a development store for our test purpose
After this step, go to the Apps option from left panel, choose the app we’ve just created, and install it to the development store you’ve just created above
Fetch Product from Shopify
It’s time to play with Shopify API. The first task is to fetch Products from our shopify stores. Let’s create products_controller.rb and assign root to products#index
Rails.application.routes.draw do
  root :to => 'products#index'
  resources :products
end
# products_controller.rb

class ProductsController < AuthenticatedController
  def index
    @products = ShopifyAPI::Product.find(:all, params: { limit: 10 })
  end
end
In this project I use bootstrap as front end template.
First, add to your Gemfile
# For making the UI
gem 'bootstrap', '~> 4.3.1'
gem 'jquery-rails'
gem "bootstrap_form", ">= 4.2.0"
After running bundle install, import bootstrap in your `app/assets/stylesheets/application.scss
@import "bootstrap";
@import "rails_bootstrap_forms";
And, create a view for this action
<% content_for :javascript do %>
  <script type="text/javascript">
    ShopifyApp.ready(function(){
      ShopifyApp.Bar.initialize({ title: "Home" });
    });
  </script>
<% end %>

<div class="row" id="products-list">
  <div class="col-md-12">
    <table class="table">
      <thead class="thead-light">
      <tr>
        <th scope="col">#</th>
        <th scope="col">Title</th>
        <th scope="col">Image</th>
        <th scope="col">Type</th>
        <th scope="col">Vendor</th>
        <th scope="col">Actions</th>
      </tr>
      </thead>
      <tbody>
      <% @products.each_with_index do |product, index| %>
        <tr>
          <th scope="row"><%= index + 1 %></th>
          <td><%= product.title %></td>
          <td><%= image_tag product.image.src, alt: "Product Image",class: 'img-thumbnail small-img-thumbnail' %></td>
          <td><%= product.product_type %></td>
          <td><%= product.vendor %></td>
          <td>
            <%= link_to "Metafields", product_path(product), class: "btn btn-link" %>

            <%= link_to "Admin", "https://#{@shop_session.domain}/admin/products/#{product.id}", target: "_top", class: "btn btn-link" %>
          </td>
        </tr>
      <% end %>
      </tbody>
    </table>
  </div>
</div>
The above code is quite simple. It just fetch the @products from controller and show it as a table on our app. The content_for :javascript is just to show the header of our app in Shopify embedded mode
Adding Header
Create app/views/shared/_header.html.erb file to store the code of the header
<nav class="navbar navbar-expand-lg navbar-light bg-light fixed-top">

  <button class="navbar-toggler" type="button" data-toggle="collapse" data-target="#navbarNavAltMarkup" aria-controls="navbarNavAltMarkup" aria-expanded="false" aria-label="Toggle navigation">
    <span class="navbar-toggler-icon"></span>
  </button>

  <div class="collapse navbar-collapse" id="navbarNavAltMarkup">
    <div class="navbar-nav">
      <%= link_to "Products", products_path, class: "nav-item nav-link active" %>
    </div>
  </div>
</nav>
Add style for it. Create app/assets/stylesheets/style.scss
//HEADER
.navbar .nav-item {
  margin-right: 12px;
  transition: all 0.2s;
  border: 1px solid #CCCCCC;
}

.navbar .nav-link:hover, .navbar .nav-link:focus, .navbar .nav-link.active {
  border-color: #30A54A;
  color: #30A54A;
  background-color: transparent;
  box-shadow: none;
  border-radius: 6px;
}

.navbar {
  border-bottom: 1px solid #DADADA;
}

#page-wrapper {
  padding-top: 80px;
}

body {
  padding: 0px 15px;
  min-width: 800px;
  margin: 0px;
}

// PRODUCT
.small-img-thumbnail {
  max-width: 60px;
}

#product-title {
  margin-left: 2px;
  margin-top: 0px;
  margin-bottom: 20px;
  display: block;
  width: 100%;
  float: left;
}
And import the style to application.scss
@import "bootstrap";
@import "rails_bootstrap_forms";
@import "style";
After this step, go to your Shopify development store, open our installed app, and see the result

Shopify embedded view for our app
Fetch Product Metafields
This time I mixed ShopifyAPI usage with an HTTP direct call to Shopify Api Thus, later you can have more powers to use
First, install HTTParty gem, and bundle install as normal
# Gemfile
gem 'httparty'
Update your app/controllers/products_controller.rb with content of below code to be able to get product data with Metafields.
  def show
    Struct.new("Metafield", :src, :alt)

    @product = ShopifyAPI::Product.find(params[:id])
    @images = []

    # store header for request call to Shopify API
    headers = {"X-Shopify-Access-Token" => @shop_session.token}

    @metafields = HTTParty.get('https://akr-recommendation.myshopify.com/admin/metafields.json?metafield[owner_id]=' + params[:id] +'&metafield[owner_resource]=product', :headers => headers).values[0].map {
 metafield| OpenStruct.new metafield }

end
In the above code, after getting metafields results, I use OpenStruct to convert data to objects, so, we can easily use it as object later. Note that you need to change your Shopify store URL on the above URL
Create a view for Product page
<% content_for :javascript do %>
  <script type="text/javascript">
    ShopifyApp.ready(function(){
      ShopifyApp.Bar.initialize({ title: "Products / <%= @product.title %>" });
    });
  </script>
<% end %>

<h2  id="product-title">
  <div class="float-left">
    <span> <%= @product.title %> </span>
    <img src="<%= @product.image.src %>" class="img-thumbnail small-img-thumbnail" />
  </div>

  <div class="float-right">
    <%= link_to 'New Metafield', new_metafield_path(owner_id: @product.id, owner_class: 'Product'), class: 'btn btn-outline-primary'%>
  </div>
</h2>

<table class="table">
  <thead class="thead-light">
  <tr>
    <th scope="col">#</th>
    <th scope="col">Namespace</th>
    <th scope="col">Key</th>
    <th scope="col">Type</th>
    <th scope="col">Value</th>
    <th scope="col">Actions</th>
  </tr>
  </thead>

  <tbody>
    <% @metafields.each_with_index do |metafield, index| %>
      <tr>
        <th scope="row"><%= index + 1 %></th>
        <td><%= metafield.namespace %></td>
        <td><%= metafield.key %></td>
        <td><%= metafield.value_type %></td>
        <td><%= metafield.value %></td>
        <td>
          <%= link_to "Edit", "#", class: "btn btn-link" %>

          <%= link_to "Delete", "#", method: :delete, data: {confirm: 'Are you sure?'}, class: "btn btn-link" %>
        </td>
      </tr>
    <% end %>
  </tbody>
</table>
This time, you will have product page with Metafields
That’s it. If you want to learn more about Metafields and how to create metafield for product, please visit my github here. This guide will go too long if I put here.
Thanks for reading & Good luck
